Sitemize Hoşgeldiniz sitemizin kuruluş sebebi Eğitim Öğretim Bilgilendirme amaçlıdır Site içerik ve kaynalar Çeşitli Web Sitelerinden Derlenmişolup Teylif Hakları Çerçevesinde Korunuyor Olabilir Şayet bugibi durumlarda lütfen Site Yönetimiyle İrtibata geçiniz Saygılar Hikmet TURNA

Nisan 2010

The original source code for this project is copied from Martin Thomas' Simple STM32 Digital Picture Frame
The application reads picture-files in standard Windows BMP-format from a SD-Card and shows them on a 2.8" color-LCD-module (320*240 px).
The application also uses the FAT File System Module by Chan, on which M. Thomas ported to work on STM32 SPI interface. Additional information about this project can be found on the link above.


Some of the minor modifications I made were:
  • I've modified the LCD driver so that it will work on my unit. My unit got the ILI9320 LCD controller.
  • I didn't utilize the USART interface (but this can be easily enabled in the code). In stead of sending the "information" through this interface , some of them are being displayed on the LCD itself (e.g. bitmap filenames).
  • I've enabled the two push-buttons on the board. The first one toggles between "Play" and "Pause"; and the other one is to "Restart" the "slide-show" from the beginning.

demo video:


Modified Source Code (Keil RVMDK + uVision 4): Digital Picture Frame.rar


FreeRTOS Demo on Mini-STM32 kit (STM32F103RBT6 with 2.8" TFT LCD).


My initial attempt of porting the FreeRTOS Demo was considerably a success. But later on, I found out that the version used of STM32 standard peripheral library was already obsolete. And so I didn't anymore continue with that. In stead, I opt to use the latest Firmware version which is v3.2.0 (Mar-2010), and combine it with the latest FreeRTOS source code - v6.0.4.

It wasn't easy for me to start the Keil uVision project from scratch (almost). On the brighter side, I already got familiarized with STM32 code libraries because of this activity. It's mostly trial-and-error approach. But luckily I stepped into this guide of porting the FreeRTOS source: Running FreeRTOS on the Keil MCBSTM32 Board with the RVMDK Evaluation Tools

Here's the result. After few seconds of displaying the "Powered by FreeRTOS" message, the demo will now display the status of all tasks. If there's no error occurred, it will show "PASS" and the 'jitter' in the processing of timer interrupt (timertest.c). For the USART test (comtest.c), there's a "loopback" test of transmitted and received characters. Simply short the pins 2 and 3 (RX and TX) of CON1 in the Mini-STM32 board. Otherwise, it will show "ERROR IN COM TEST" message.

Source Code (Keil RVMDK + uVision 4): FreeRTOS on MINI-STM32.rar


I've recently bought a Mini-STM32 kit for the purpose of learning ARM-based MCUs. These development kits were from China and then locally distributed by DIY Hobbyist Corner at an affordable price.
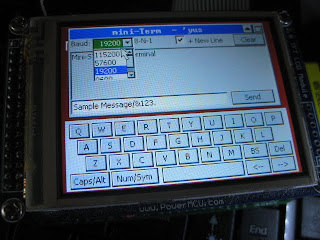
After playing with the example codes, including the uCOS/uCGUI demo, I came up with this Mini UART (serial) Terminal application.

I just utilized the source/library for OS of the uCOS_DEMO since I still don't understand how it works. Luckily I got a copy of uCGUI manual and so I manage to make modifications on the existing sample GUIs (graphical user interface). And later, I'm also able to design my own GUIs.
The USART interface is not difficult to learn since it's almost similar to what other microcontrollers is using. Therefor, it's also easy "porting" the USART code (using standard C language) from my previous MCUs to this STM32 MCU.

The application uses the touch-screen capability of the kit for the keypad interface. However, because of the small LCD area, it's impractical to design the keypad as a full featured "qwerty" keyboard. What I did was just provide alternate characters for most of the existing keys.

"Caps" key pressed and USART baudrate chage:
"QWERTY" key toggled and MainForm minimized(showing desktop background):
Alternate keys/symbols and movable dialog:

It's also possible to use a "gender changer" (DB9 female to DB9 Male) on CON1 of the kit to make it resembles as a common PC serial port.
A problem may also raises because of the possibility that the touch-screen response will vary with different units. So, I added an optional "touch-screen calibrate" at start-up. This option can be found on "miniterm.h" header (the "calibration" code is also copied from one of the demo/example codes).

Source Code (using Keil RVMDK + uVision) download: mini-Term.rar

forum link: Mini STM32 with 2.8 LCD and touchscreen


MKRdezign

İletişim Formu

Ad

E-posta *

Mesaj *

Blogger tarafından desteklenmektedir.
Javascript DisablePlease Enable Javascript To See All Widget